We decided early on to dedicate a room to school - a place that was always there with anything they desired to learn from.
So here is a quick tour of our space.
We have a dedicated reading corner (which you can see gets alot of use)
To the side of this space, just under the window ledge, is our 'Artist of the month' display area. We usually have about four pictures displayed at eye level from whichever artists we are learning about.
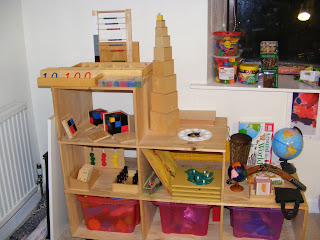
Our Montessori shelves (we change the equipment on these every couple of weeks but add any extras if I feel they need more exposure to) The big boxes at the bottom contain their learning toys - lego, bricks, puzzles etc
Our work space - we did originally use individual desks but they preferred sitting next to each other so got a great table from IKEA and chopped the legs down to a level that suited.
We also have a blackboard ,and display board in the corner above the desk with a calender and Periodic table to each side. The rubber mats under the desk are one of my essentials - they have saved me from hours of scrubbing paint etc out of the carpet.
Our last area is our computer table - this was a bit controversial at first but we decided to only let them have free access to Brainpop - its additionally used as part of certain lessons.
As you can see the computer desk sits on two of the workboxes (loosely based on Sue Patrick's workbox system- for more info visit http://www.workboxsystem.com) These ones are for the DD4 and DD2 - DD4's contain a mix of Letter of the Week curriculum from Erica at http://www.confessionsofahomeschooler.com and Montessori materials (if the item is too big for her drawer she is given a card to go to the shelves to collect it) and DD2's are just Montessori materials, tot games and puzzles.
Workbox drawers for DD6 are next to a second bookshelf just inside the entrance and DD8's are to the side of the computer desk. Their drawers contain the basics I need them to do each day, research assignments and the Montessori materials they need to work on for that day.
We have posters on the door (again at their eye level) that change often to match whatever we are working on.
I will post later about how our day is structured and give examples of what we have in our drawers.


4 comments:
I love how practical, simple and yet comprehensive your room is. Very inspiring!
I would love to know more about how you made your library shelves. Might you email me or leave a comment on my blog to tell me? Thanks!
I love your school room! I always enjoy "peeking" into other homeschooler's spaces and I get so many great ideas from them! Thanks for sharing!
Love your reading rack in your reading corner and the fun, bright IKEA table!! May I ask where you got the black tiles you put under the table? Your room looks like a fun, inspiring place to learn :o)
LOVE your classroom and I especially love what you did with the book shelves! how, if you dont mind me asking, did you create something like that?
Post a Comment